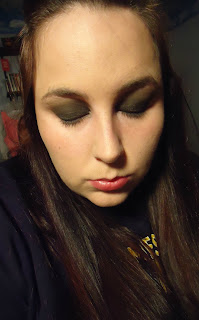
Here's the look...if you wanna see how I created it, keep reading!:
1. I suggest you do your eye makeup before anything else because black is a very potent color and you don't want to have to re-do your whole face makeup because of some black eyeshadow fall out on your cheek bones!
2.Apply a primer to your eyelids and lower eyelids. I prefer Too Faced Shadow Insurance.
3. To make the black eyeshadow not so harsh and to give it a semi gradient effect, I use three different shades of brown with my crease brush (the one with the silver ferrel). I apply the lightest brown from the crease up to just before my eyebrows. Next, I will use the medium brown from the crease to the half way spot between your brows and crease. Finally, the darkest brown I will only apply in the crease.
 |
| These two bottom browns work fabulously as the medium and dark brown. They're both discontinued from MAC. Showstopper and Cross Cultural. |
 |
| The top left corner is the light brown I use. It's MAC's Wedge. |
 |
| The regular eyeshadow brush from ELF and a Crease Brush. |
4. Apply a black base to your eyelid with your finger, avoiding your crease, but make sure it's spread out. I like to use NYX Jumbo Eye Pencil in Black Bean. Don't worry. It WILL look messy. It will be fixed up/covered up later with the black eyeshadow anyways.
 |
| NYX Black Bean |
 |
| This is how your finger should look after you have blended. Hah. |
5. Use the regular eyeshadow brush (all black one in the picture) and start patting on the black eyeshadow. Once you think you have a nice layer of eyeshadow, start to blend it with the darkest brown eyeshadow. If you need to go back with either color, you can. Just remember, you can always add color, but it's really hard to subtract it!
 |
| I used Creep as my black eyeshadow from the Naked Palette from Urban Decay. |
6. Blend some more. Make sure everything is even on both eyes. Clean up with a makeup wipe/Q-tip if necessary especially in areas like the corners of your eyes, or if you have any fall out on your cheek bones.
7. Use this angled fluffyish brush (it's from elf...cost $1 at Target!) and pickup a skin colored eyeshadow to blend out the very top where the edge of the eyeshadow ALMOST meets your eyebrows. You don't want a sharp edge where the eyeshadow ends and your bare skin begins! Use the lighter color to not only fade/blend the eyeshadow line, but if you think you went a bit too far up with the shadow, you can tone it down with this skin colored eyeshadow. Spread evenly and blend!
 |
| I used the top right cream white color. It's Shroom from MAC. |
8. Line your waterline, curly your eyelashes and add your favorite mascara (Two coats!)
 |
| All Done! |
9. Optional: I love falsies so I will be adding them on NYE but you don't need them :] If you do want to add false eyelashes click right HERE for my blog on How to Apply False Eyelashes!
And this is the final look. This is my go to look when I'm in a rush to go out and need something real quick. It's fairly simple and amazingly dramatic. <3
let me know if you have any questions, comments, or suggestions.
Happy New Year!
Alleighkins


No comments:
Post a Comment